How to use Acrea on various types of Canvas
Hello Copic readers! In our previous blog, we wrapped up our discussion on how to use Acrea on various weights and types of papers. In today’s blog, we are going to continue that focus, but instead, explore different types of CANVAS and how you can use Acrea with regular acrylic paints! With that, let’s get started by taking a look at the types of canvas we’ll be demonstrating in the table below.
|
Art Alternatives Canvas Pad
|
Strathmore Black Canvas Paper, 300 Series
|
Blick Studio Cotton Canvas Panel
|
Fredrix Artists Quality Stretched Canvas (red label)
|
|
|
Canvas color
|
White | Black | Cream (originally white, but was coated with a thin layer of beige) | White |
|
Canvas sizes (inches)
|
4 different sizes, 9x12 is used in this blog | 4x6 sample size is used in this blog | 25 different sizes, 6x6 is used in this blog | 28 different sizes, 6x6 and 6x8 are used in this blog |
|
Acid free?
|
Yes | Yes | Yes, acid-free core | Yes, 100% acid free |
Primed? |
Yes | Yes | Yes | Yes, double-primed |
Grade |
Student grade | Student grade | Student grade | Artists’ grade |
|
Texture
|
Medium texture | Textured finish | Medium texture | Medium texture |
|
Good for both Copic markers and Acrea?
|
Yes | No…Copic markers are alcohol-based and soak into paper, making lighter surfaces a better choice | Yes…although not a top choice (papers, specifically marker paper, works best for alcohol-based markers) | Yes…although not a top choice (papers, specifically marker paper, works best for alcohol-based markers) |
*The above chart is an overview of just a few different canvas brands, weights, colors, and sizes. There are many other canvas brands out there to explore, do not feel limited by this list!
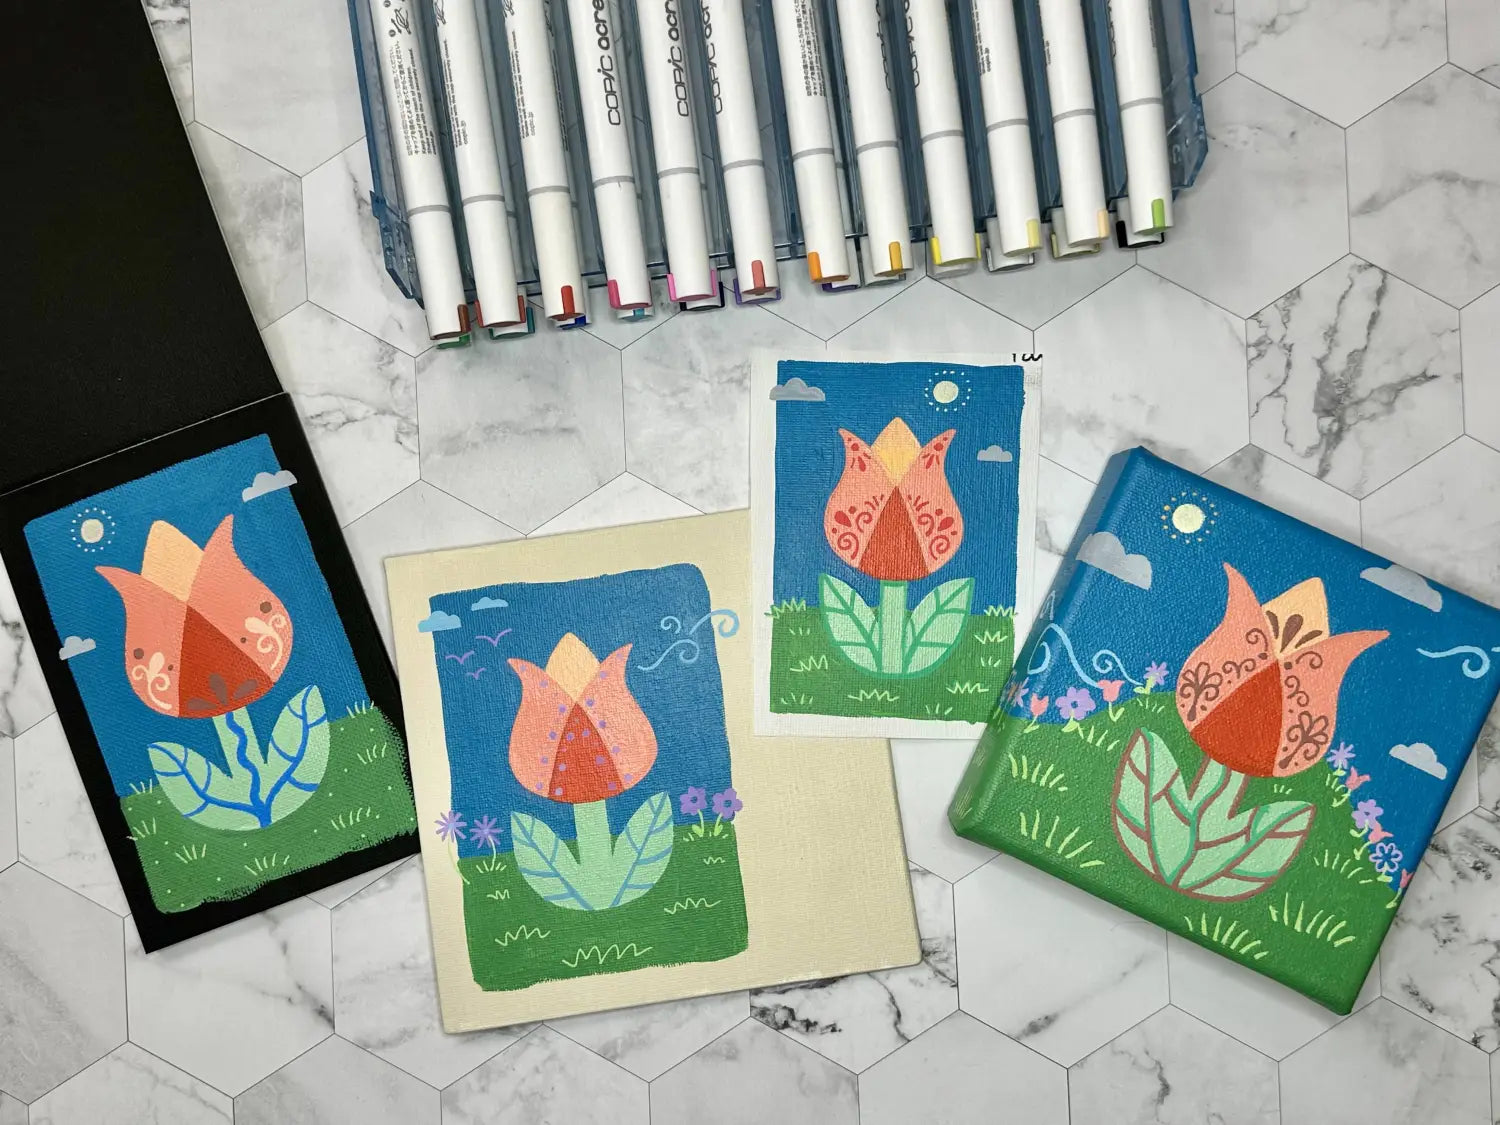
Examples of Acrea on various types of canvas. From left to right:
1st canvas: Strathmore Black Canvas Paper, 300 series. 2nd canvas: Blick Studio Cotton Canvas Panel.
3rd canvas: Art Alternatives Canvas Pad. 4th canvas: Fredrix Artist Quality Stretched Canvas.
When using Acrea, what kind of canvas should I use? Even though this is a simple question, in order to answer it, you need to consider a few things first.
- Do you plan on using Acrea with any other materials, specifically acrylic paint?
- What size surface are you most comfortable with?*
- Do you like a surface with texture, or for it to be smooth?
- Do you prefer to work with a white surface, off-white, toned, or black?
With just these few simple questions to get started, it will help tremendously to narrow down what type of canvas to choose! When it comes to canvas choices, a lot of it boils down to quality and personal preference. If you’re unsure of what canvas you like best, we recommend starting off with a small, medium texture, student grade canvas pad in order to test canvas properly before buying a large size or quantity. Plus, as you grow more comfortable with acrylic paint, canvas pads/sheets work as a great way to swatch paint colors or test blends before applying it to a larger, professional work.
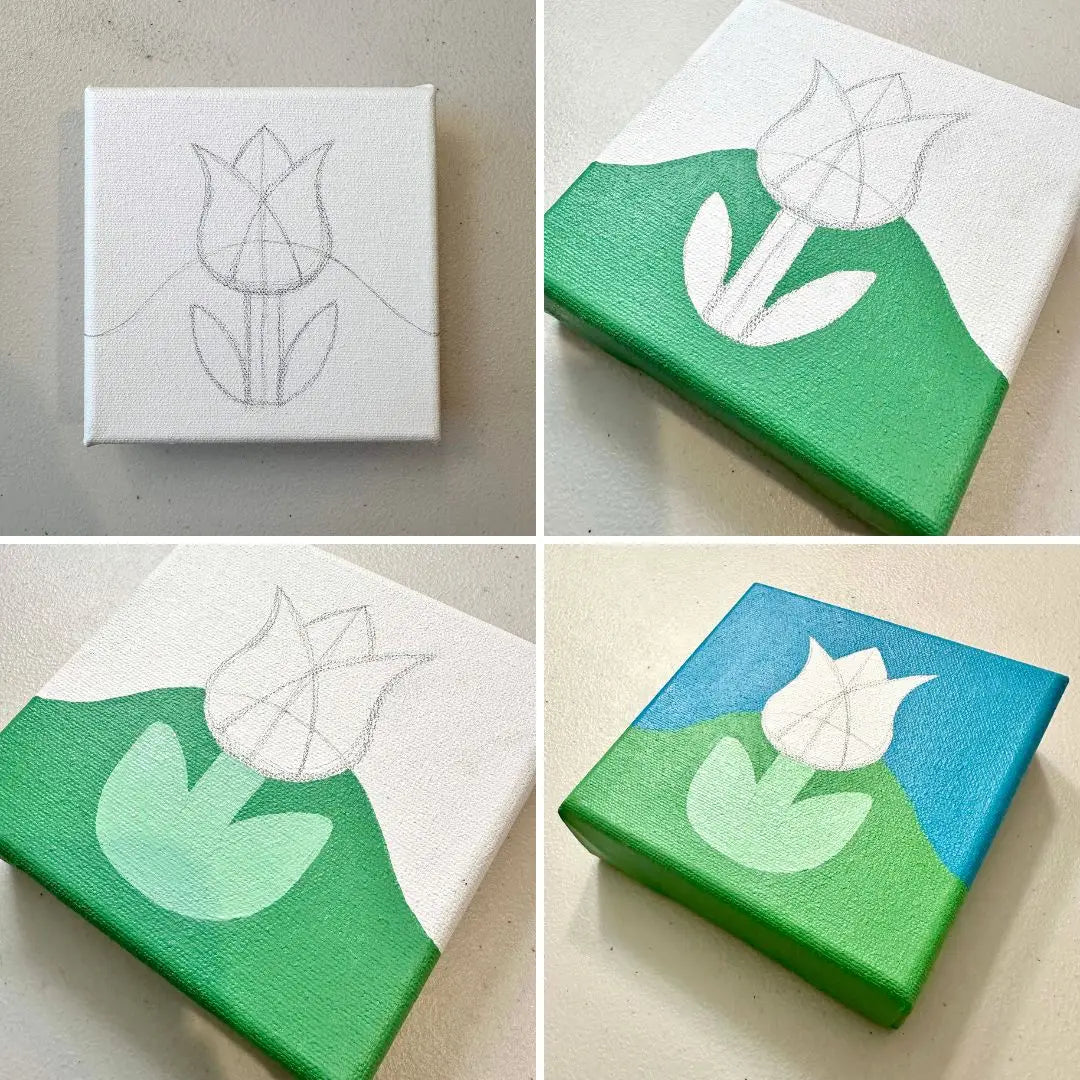
From top left to bottom right.
Step 1: Pencil sketch of the tulip and background shape. Step 2: Paint the large area of green grass.
Step 3: Paint the tulip stem and leaf color. Step 4: Paint the large area of blue sky.
Now that we’ve discussed canvases, let’s discuss how you can use the fine Acrea nib with regular acrylic paint. Throughout our blog series discussing this new Copic product, we’ve mentioned how the order of which you apply your materials matters. When using Acrea with acrylic paint, this consideration remains just as important. First, cover the area of your canvas with regular tube acrylic paint - especially larger shapes and background areas. Let the paint dry, and then add the Acrea details on top.
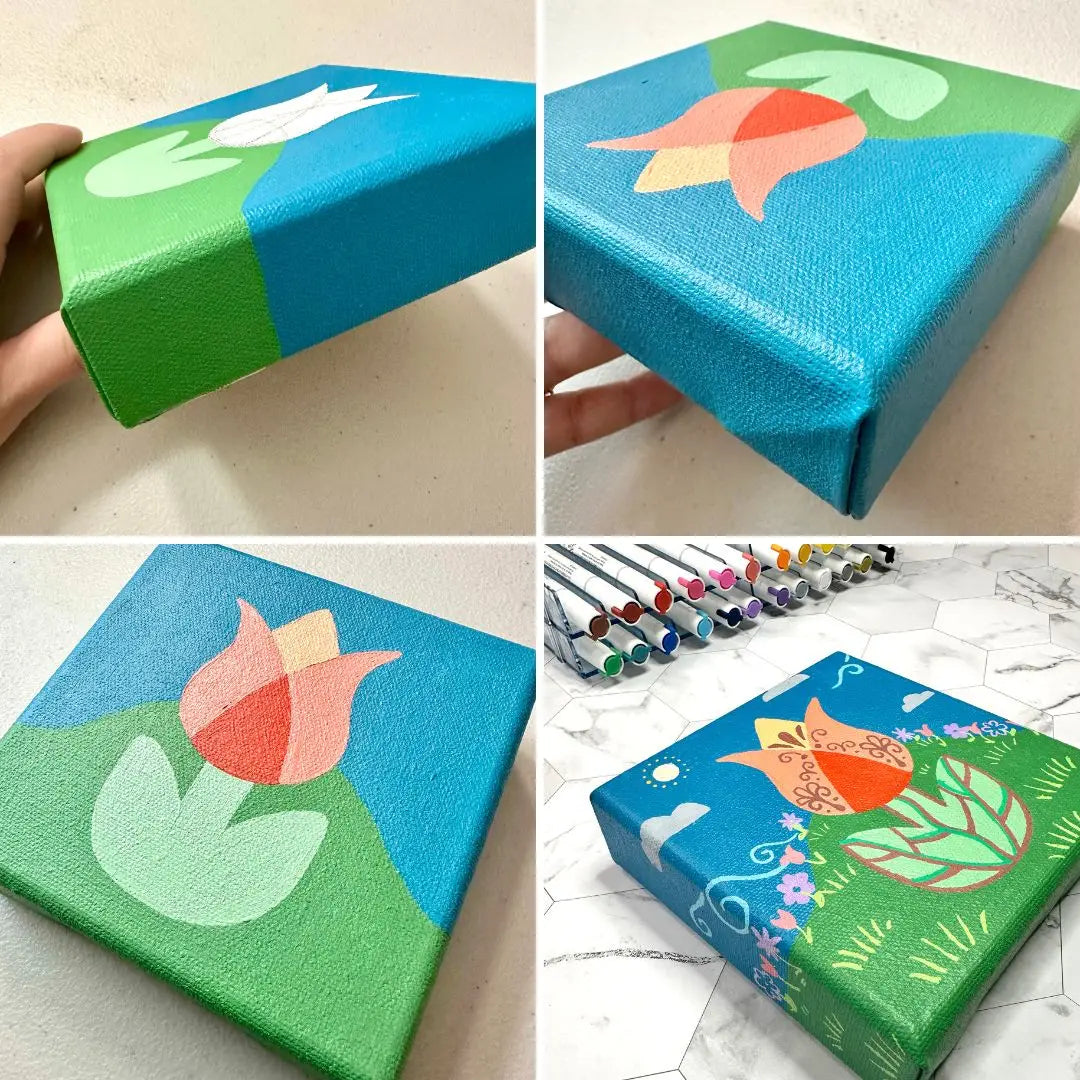
From top left to bottom right.
*Note (not really a “step,” but something to keep in mind while painting the background): When working on a wrapped canvas like this, make sure to continue painting to the very edge of the canvas, close to the back of the wooden frame. This makes the work look more “finished” and professional!
Step 5: Paint the tulip. This can be done with multiple colors (as shown), or with one color, depending on how much detail you want for the underpainting before Acrea is added.
Step 6: Add Acrea!! This is a perfect opportunity to test how the Acrea paint marker works on top of acrylic paint! Once again, don’t forget the edges!
Once your acrylic and Acrea painting is complete, it’s time to seal and protect your work. This will help when wiping off dust or anything that may be thrown at your work. A popular artist's choice is using Krylon Kamar Varnish, which is a non-yellowing spray used to protect oil, acrylic, gouache, and watercolor paintings (in case you’re wondering - YES! You can also use Acrea on top of watercolor and gouache paintings too!). This spray varnish helps to preserve the “fresh-from-the-palette” look of your paint and is acid free. All you need to do is go outside and shake the can thoroughly for about 30 seconds. Using a pizza box/spare cardboard, test the nozzle a few times to make sure it’s spraying evenly. Then, grab your painting and place it on the cardboard. Pressing down on the nozzle, gently sweep across your painting at a steady pace from the bottom to the top; then wait a few seconds and do it again from the top to the bottom. Repeat this twice for optimal coverage and assurance that your painting is now protected. If you have a garage, place the painting in there while it cures because there can be an odor from the spray. If you do not have a garage, place your painting by an open window or desk fan.
Want to test out acrylic paint with Acrea yourself? Follow the above steps using either the same basic tulip shape or another shape of your liking. Using a small wrapped canvas or sheet of canvas paper, sketch out your design and begin by painting the background! Once the underpainting is dry and complete, add Acrea!
And with that, we wrap up our blogs for 2024! Have a wonderful and safe New Year, and stay tuned for what we have in store for 2025, where we’ll be sharing more mixed media and DIY projects for how you can use Acrea.
Until then, don’t forget to follow us across our social media channels @copic_official_us, and sign up for exclusive discounts and prizes by joining the Copic Club! One last thing - use #copicwithus or tag us @copic_official_us for a chance to have your drawings featured on our Copic US social media channels and the homepage on our website!
Thank you so much for reading and enjoying Copic markers as much as we do! 😀
